My Dynojet Carb Kit Experience
Specifically, the mods I have made are:
- Removed the Air injection system (BC Air Injection Removal Kit)
- Removed the stock Airbox (BC Airbox removal kit)
- Installed free flow air filters (K&N)
- Installed open free flow exhausts (BC Predators)
- Installed billet intake manifolds (TPUSA)
Most of what I have done to date to the stock Keihin CVK carbs has been based on a document published by Jenks Bolts, a British motorcycle shop (Jenks Bolts – Tuning Notes for the Triumph “Modern Classic” Family of Motorcycles – FEB 2007). Their tuning solutions involve using various sizes of Keihin jets, and either stock OEM Bonneville or Thruxton needles, and drilling the slides.
See these past posts for more details and photos on what I have tried:
Using their document as a guide, the best carb tune setup I had arrived at for my particular 2008 Bonnie was as follows:
- Thruxton Needles (From Triumph)
- 1 Shim
- Stock springs
- 150 main jets
- 42 pilot jets
- Slides drilled to 3mm
- Idle Mixture Thumbscrews (NewBonneville) turned out 3 turns
- Carburetor stainless steel screw kit (New Bonneville)
This setup runs pretty good for me. However, in reading various online forums on Triumphrat.net, I had noticed a lot of people liking the Dynojet system. So, I purchased the Stage 1 kit from New Bonneville. As I read the instructions, I realized that the Stage 1 kit was not intended for Bonneville’s that have had the extent of modifications that mine has (see image below).

I went to the Dynojet website and saw they made Stage 2 and Stage 3 kits that sounded like they would be a better fit for my setup. Further investiagation revealed that they do not make Stage 2 or 3 kits for the Bonneville.
So, I emailed Dynojet about this issue and Mike Cory in their Research & Development department responded. He told me the The Stage 1 jet kit should still be a good starting point, but that I would need to use larger main jets than what were supplied in the kit. With the K&N pod filters he suggested that I would need main jets in the DJ140 range.
Mike told me that the Dynojet jet size/number designations are roughly equivalent to the Keihin size/number system. So, a DJ140 is about the same size as a Keihin 140, which I had already.
Which Springs to use?
I was also unclear about what to do with the Dynojet springs which are not as stiff as the stock springs. Again, in an email reply, Mike suggested that I might try the stock springs, and then compare the performance with the Dynojet springs. He told me that the spring determines when the slides will lift, and the lift (slide) holes determine how fast the lift happens.
The Dynojet Stage 1 Kit Installation
So, I decided to test the Dynojet Stage 1 Kit conversion on my Keihin CVK’s with the suggested modifications for my setup and see what the results would be.
I went through the normal procedure to remove the seat and gas tank, in order to get at the carbs. I removed the carbs from their mounts to the intake manifold so that I could easily access both the bottom and top of the carbs.
Starting with the bottoms, I removed the float bowls, and replaced the Keihin 150 main jets with size 140. I replaced the Keihin 42 pilot jets with size 40 (stock). I reinstalled the float bowls.
Finishing with the carb tops, I removed the covers, then the springs and then the slides. I removed the Thruxton needles and shims and replaced them with the Dynojet needles.The interesting thing about the DJ needles is that they have 4 grooves at the top end where small “E-clips” can slip snuggly into. I installed my “E-clips” in the 3rd groove from the top, per the instructions below.
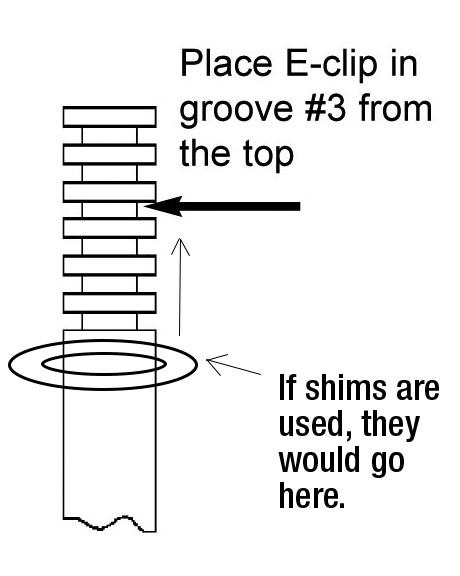
I then added two shims (tiny washers) over the “E-clip” per the instructions in Figure A and inserted these in the slide, and the slide back into the carb. I decided to try the DJ springs first, so I also replaced the stock springs with the DJ springs, and then reinstalled the carb top covers.

I then put the motorcycle back together in reverse order… carbs, filters, gas tank, seat, side covers.
The results of using the Dynojet parts
I have to say that this newer setup with the Dynojet needles, shims and springs performs better for me than my previous setup. I have noticeably more power at the low end, and above 4000 RPM I still get a stronger “pull” when accelerating. I did have to adjust my idle screws out another 1/4 turn from the suggested 3 turn starting point to get the best idle,
I may try changing the “E-clip” position per the troubleshooting instructions to improve a slight hesitation I sometimes get when accelerating hard above 4000 RPM.
Even though this experiment didn’t go as smooth as originally planned due to lack of correct information, I am happy that I persevered, got the information I needed and gave it a try. I would have to say that Dynojet seems to know what they are doing as I am initially impressed and pleased with the performance of their kit. Time will tell if this holds true.
December 23, 2012 Update
I have replaced the Dynojet springs with the stock Triumph/Keihin springs. The initial sensation was that it performed a bit better. The acceleration seemed smoother to me. I also adjusted the idle mix screws out another turn (4x) to get the best all around balance.
As of today, this is the best setup I have experienced. The idle is smooth, acceleration strong, response very quick, and a lot if power in the upper RPM’s.
I can wholeheartedly recommend the Dynojet system.
April 3, 2013 Update
Per the helpful comment below from Michael Cory at DynoJet, I have corrected my description about where the “shims” are placed on the DynoJet needles. Unlike stock needles, the shims go “above” the C Clip with the DynoJet system. I apologize to any I may have mislead about this detail – especially Leif! (See his comment below)
Lesson: It pays to follow the instructions, even when it isn’t intuitive or what you expect based upon other experiences!
I made this correction on my Bonneville last night and so far, so good. It fired up right away and seems to deliver as good or better performance on my machine than when I had them installed improperly. I still have a rough idle, but I believe that is caused by other issues I am currently tracking down (new coil and wires coming).
April 14, 2013 Update
Since I corrected the shims position in my CVK and Dynojet setup on April 3, the Bonnie has run better. However, I noticed that it would “cough” between 2000 to 3000 rpm, mostly on deceleration, or when cold.
So, I decided that my stock size 40 Keihin pilot jets might be too small for my application and I swapped them out for size 42’s. Wow, what an improvement! I had been monitoring my gas mileage for a week and the best I could get were to mid to high 30’s. Yesterday, after this pilot jet swap, I got 43 MPG on my first ride, and that is in addition to much better performance.
So, my current awesome setup is:
- Dynojet needles
- 2 shims each side above C clips
- Stock Keihin springs (not the Dynojet springs)
- 140 main jets
- 42 pilot jets
- Slides drilled to 3mm
- Idle Mixture Thumbscrews (NewBonneville) turned out 2.5 turns
Hello Randy!
You write:
“I then added two shims (tiny washers) under the “E-clip” You ment over the E-clip Right?
Leif
Leif,
I have updated the diagram to be clearer about which side of the e-clip the shims go on. Let me know if this helps.
Randy
Yes, thank you! I think the drawing from Dynojet are not good, it looks like the shims is on the top of the E-clip and they wright in the instruction ” place the shims ABOVE the E-clip!?
Keep up your good job on your homepage!
Leif
The Washers MUST be installed on top of the E-clip, not under it! If you install the washers under the e-clip it will be like having the e-clip one groove higher. They are there to take up the space between the slide and the needles retainer, so the needles do not move up and down to much.
“2. Install the Dynojet needles on groove #3 from the top, using all stock spacers (Fig.A). Install the Dynojet washers above the E-clip (2 per needle).”
Michael,
I am assuming when you say “above” you mean literally “above” as the needle is positioned inside the carb. Thanks for making this clarification and correction! I guess it pays to read the instructions carefully and closely! You might want to upgrade your instruction diagram to make this clearer!
I will make this change on my Bonneville this evening and see if it makes a difference… which it probably will! I’ll also then update my blog post per my experience!
Randy
Hello!
I have now changed the washer position and my Triumph gos like a rocket with:
– DJ 146 main jet
– 3 mm Drilled slide
– 2.75 turns out on the “newbonneville” mixture screw
– NGK Iridium sparks plugs
My Dynojet kit is: Stage 3 E 5321.001 “European Models Only” 2004-2005 Triumph Truxton.
I don’t think Dynojet sells this kit in the US becuse of the hard pullotion laws.
I ordered my kit from British Racer in Italy.
And yes! I agee that Dynojet should write/highlight in their instructions why the washers/shims are placed above the E-clips so that people coming from the stock OEM needle setup are less likely to make this same mistake!
Best regards from Leif in a cold Sweden
Randy, thanks for all the great info on your site.
What do you mean when you say ‘slides drilled to 3mm?’
Moh,
In an earlier post I describe how I modified my Keihin CVK carbs following a document by Jenks Bolts.
http://triumphbonneville.org/my-jenks-bolts-keihin-cvk40-carb-jetting-experience/
In summary, in the carb slides (the floating piston in the center that holds the needle) there is a small hole that regulates the air flow between the top and bottom of the sliding piston. They suggest drilling that hole a bit larger, which is what I did. When you do the other modifications (re-jet, remove airbox, free flow exhausts, etc.), it shortens the throttle response time.
Hope that helps explain it.
Randy
I found 140’s with 42 for the idle jet, 1 shim and stock needles and springs worked perfect. 2 turns on the idle adjustment screws, I was gold. I ripped out the air box, and installed k&n pods for the intake side. I got some turn out free flowing exhaust tubes off E-Bay. I couldn’t be happier.
Hey Randy, just wanted to know if you or any of the other guys can give me some advice?
I have a 2008 Scrambler (carry model), air box removed, K&N pods, Arrow 2-1.
I bought it like this back in April and according to the shop who serviced it last month the previous owner didn’t re-jet to suit. He had a little tinker and swapped some jets but i have a Dynojet Stage 1 kit coming which i will install asap.
My question is, seen as there’s not the same amount of info on the net regarding Scrambler set up like there is for the Bonny, what jets and needle height should I use taking into account i’ve removed the air box? And, because of the mods should i have tried to track down a stage 2/3 kit?
Any help would be much appreciated,
cheers
Jim (in Sydney)
Jim,
Sorry for the delay in responding. My initial thought is that you would follow similar settings as the Bonnie because the only real difference in the engines is the degree crank used. The CVK carbs are the same. My guess is you should be somewhere around the same setup as I ended up with on my Bonnie using the Dynojet needles, and the jets I used.
Anyone else want to chime in?
Randy
HI Randy, I have been trying to get my 790cc Bonnie running on Dyno kit for a few weeks. Installed the kit (does not come with new springs now)…..new main jets, new needles with clip in 3rd slot from the top and two washers (very loose fitting) simply sat above the clip. Also used the drill supplied to open up the lift hole in the slide. Set the pilot screws to 3 turns out as per DJ recommendation………..find the bike very hard / reluctant to start and has a large hesitation when opening the thottle hard below 4,000rpm? Following the DJ instruction I dropped the needles down one notch (2 notches from top) hesitation has not chnaged 🙂 also still hard to start and have tried pilot settings from standard 2.5 through to 4 turns out…….sadly finding support from DJ to be very poor and wishing I had left everything stock and saved the £100 and hassle
Hi Rob,
Sorry to hear of your troubles. Hopefully all is not lost and we can sort out the issue. In order to help, can you provide the following info?
First, Year and Model?
What modifications have you done, if any, to the exhaust system?
What modifications to the intake system have you made, if any?
Which DynoJet kit did you buy, and from whom?
Did you also change any of the jets when you installed this kit?
For reference, the Dynojet Stage 1 kit should come with different springs and no drill bit. http://www.amazon.com/Dynojet-Performance-2005-2007-Triumph-Bonneville/dp/B000GV913U It is designed to work best with aftermarket pipes and stock replacement air filters like K&N.
Let me know…
Randy
HI Randy,
I have emailed you direct, I bought the DJ kit Stg 1 from NEC motorcycle show from distributor recommend by the DJ stand? The kit came with a drill bit but no springs? IT had 3 sets of jets and I fitted the middle set as instructed and the needles set on third notch.
Bike is a 2001 790cc Bonnie running stock airbox and new filter, also fitted new inlet rubbers between carbs and head to eliminate any risk of air leaks. Have fitted different slip on end cans (Dunstall) which ran fine with std settings but stated that they were capable of working better with larger jets etc.
In summary all I have done is fit the DJ bits supplied and follow the DJ instructions and sadly as a result my bike has been off the road for 4 weeks.
Yes I have double checked the installation (even dropped the needles)……..I’m a degree qualified mechanical engineer so not alien to working on machines (service and maintain all the family bikes, family cars and even classic cars and race cars for last 30+ yrs)
HELP needed as this bike is booked on a charity ride for local Air Ambulance in less than 2 weeks and at present it looks like I will need to take my Blackbird instead which will not be the same
Rob,
I guess if you have followed all the DynoJet installation recommendations and it doesn’t run better, you might try:
• a different set of jets… maybe the least radical ones
• try finding someone who has the dynojet springs (they are weaker that the stock ones to allow the slides to be more responsive)
• removing the baffle inside the airbox to increase airflow to the carbs
• going back to the stock needles and jets
I confess that I have not seen a DynoJet kit that included a drill bit and instructions for drilling the slides. That information for me came from an outfit called Jenks’ Bolts and was separate from using the DynoJet kit.
When I had questions, I found Mike Cory at DynoJet to be very helpful: [email protected] or 800-992-4993 x1123
Good luck… I hope you can ride it in the charity ride.
Randy
Just looked at the link you sent and my kit did not have the same number of parts (was sealed and delivered from dealers and appears to be genuine)
My kit 2001 – 02 Triumph Bonneville & Bonneville American Stage 1 Stamped number that looks like serial number = 1823810115. Other reference number appears to be E51117.002 in top RH corner of instruction
Turn over same piece of paper and find it states Stage Two instructions, line item
2) use drill provided DD32 to enlarge slide lift hole????
3) Install needles on groove 3 with two washers above (placed on top of circlip in 3rd slot)
4) Remove main jets and replace with DJ108 for stock, DJ 110 for after market cans (DJ110 fitted)
5) Adjust mixture screw to 3 turns out
Sadly seem to miss a line 6) saying bike will not run again………..!
Rob,
It seems that you may have the wrong kit for your 2001 Bonneville as it is a Stage 2 Kit. I used a Stage 1 Kit which I ordered here: https://newbonneville.com/shop/dynojet-jet-kit/ The instructions that came with it are posted in my blog here: http://triumphbonneville.org/uploads/dynojet-stage-1-instructions.pdf You can see that the kit says nothing about drilling the slides, nor did it have the drill bit.
As I understand it, drilling the slides won’t cause your problem… it only affects the responsiveness of the throttle… but I think you’ll need the springs to experience that.
My advice is to try to get the stage 1 kit and use the parts from it. That’s the only kit I have experience with.
Randy
Hi Randy, sorry not emailed you direct, have actually been trying to get hold of a person called Mike Cory at DJ who I first shared my bike off road situation with, but have yet to get constructive support back from DJ……….very frustrating
Thanks Randy, I will give DJ a while to reply and resolve, if I the current level of support does not improve then I will start a CCJ against the supplying UK dealer (not named on here for obvious reasons) under sale of goods act 1979 (not fit for purpose) to get my money back (plus any costs for replacement stock parts – helps when your best friend lives two doors away and is a Barrister)
TBH the support from DJ has been VERY POOR and inconclusive (lots of circular references)
I know you have a starting problem, but let’s go over proper tuning steps, first.
Put the main in that pulls the hardest at full throttle / high rpm. Not just “ok”, but the best size.
With that main jet, raise or lower the needle for best full throttle / midrange power.
With that man jet and needle height, raise or lower the fuel level for best full throttle / low rpm power.
Now you should not have a bog under acceleration. (because you fixed that with proper tuning)
As far as your starting problem, first you need to properly tune your fuel screws.
Synch carbs.
Warm the bike up and lower the idle as low as it will idle.
Adj one fuel screw, while running, in 1/4 turn increments, to its highest idle setting.
Now, with the idle speed adjuster, lower the idle again to its lowest idle.
Now, adjust the other fuel screw to its highest idle setting.
Lower the idle with the idle adjuster and repeat optimizing the fuel screws until each fuel screw is dialed in.
Now raise the idle to something under 1000 rpm.
If you ended up at 1.5x turns out, your pilot jet is too large.
If you ended up more than 3.5x out, your pilot is too small.
Here’s a link to my full procedure:
http://www.factorypro.com/tech/tech_tuning_procedures/tuning_carbtune,CV,lower_rpm_engines.html
I don’t generally enlarge or add slide damping holes – it makes jetting pickier for installers.
The fit of the needle shims is not important (within limits).
2 shims is about the height of one groove.
I put the needle shims under the clip and adj needle height from there.
Yes and we do make carb kit for your 790.
Marc Salvisberg
415 491-5920
http://www.factorypro.com
[email protected].
Your comment is awaiting moderation.
Who knows……may even go for a winding up order in UK if they continue to ignore / fail to correctly recompense
Just looked at the link, both kits have same number E5117.002 but have different contents? Very frustrating……my kit clearly states Stage 1 on one side and then says Stage Two Instructions……..no springs but a drill bit, different jets etc….starting to realize why fitting the kit supplied and following the instruction has killed my bike….thanks DJ importer and distributor.
My kit clearly states to stick with stock springs??? If I had not gone through the UK distributor then I would be starting to thing I had bought a far east copy……….then again a far east copy may have worked better and would feel so painful when you chuck it in the bin
Update……DynoJet have sprung into life, confirmed my kit is correct, now picking the bike up to take it to their workshop to find out whats gone wrong……pick up Monday, return Thursday / Friday, hopefully running and in time for the Charity Ride with Steve Parrish on the 8th…………will update with outcome.
That’s good news Rob! Thanks for the update.
Bike back from Dyno Jet…put a lot of effort into fixing it…………when running it has more power but starting, and bouts of fuel starvation and hesitation around 2,000 rpm means I wish I had not fitted the kit and kept fuel / carbs std.
Rob, sorry to hear of your ongoing disatisfaction, even after a going over by DynoJet. I’m a little confused by the reference to getting your bike back from DynoJet… are you saying that you took it to one of their “Approved Tuning Centres?” http://www.dynojet.co.uk/index.php/atcs?type=1 — Were you able to talk to them about the poor performance at 2000 RPM, and if so, I’d be interested to know their expalnantion. Finally, given your disatisfaction, have you considered returning the bike to its original stock setup? That is very doable. Just thinking….
Randy
Hi Randy,
Dyno Jet UK picked the bike up to try fix it, They spent over 3 days on it……….the results are as I listed, struggles to start Cold or Hot (normally large backfire when hot) when started it is not very stable until very warm. It then runs OK……..basically from 2,000 rpm upwards it runs well 90% time, but can give impression of fuel surge especially if steady throttle and cornering (seems to happen more on RH bends) .
Still suffers hesitation at times anywhere from 1,500 to 3,000rpm…..feedback from Dyno Jet was that the they had installed the original items and the starting issues were still there (never had a starting issue all the time I have owned it) they first thought battery may be faulty and not have enough energy (was new last August) next was a thought that the starter was possibly drawing too much current (this could be a possible as it is original and of late it has worked VERY hard trying to start the bike) next they said that possibly the pick ups are faulty (again never had a spark problem and they even said it looked healthy)
Anyway they managed to install the kit (4th Groove from top on needles as bike was running lean) said that the carb balance was spot on (thank you :-)) also said that the fuel to air mix was excellent for carbs………So bike comes back home with nothing more they can do for me.
So bike now back at home……seems to start after 3 or 4 attempts cold or hot but it is very fussy and you fear it will not run. It then revs hard on choke and settles to a nice smooth tick over…………so based on the infrequent hesitation, feeling of fuel starvation I can’t see that these can be tied into the claim from Dyno Jet (i.e. Battery poorly, Starter motor poorly, ignition pick ups poorly………………but it ticks over perfect, will run flat out but sometimes hesitates or feels starved of fuel (same feeling as when you are about to go onto reserve…….?
Bottom line is not to buy anymore Dyno Jet kit as it has wrecked this bike and my confidence in it, currenlty trying to decide next step……try to go back to std or sell it and move on
Hi Rob,
Just a thought – Did you try adjusting the fuel screws to where they actually wanted to be on a running engine?
The fuel screw setting procedure is provided in my previous long post. That’s the first things I’d do if we were tasked with fixing your bike.
Marc Salvisberg
[email protected]
I know you have a starting problem, but let’s go over proper tuning steps, first.
Put the main in that pulls the hardest at full throttle / high rpm. Not just “ok”, but the best size.
With that main jet, raise or lower the needle for best full throttle / midrange power.
With that man jet and needle height, raise or lower the fuel level for best full throttle / low rpm power.
Now you should not have a bog under acceleration. (because you fixed that with proper tuning)
As far as your starting problem, first you need to properly tune your fuel screws.
Synch carbs.
Warm the bike up and lower the idle as low as it will idle.
Adj one fuel screw, while running, in 1/4 turn increments, to its highest idle setting.
Now, with the idle speed adjuster, lower the idle again to its lowest idle.
Now, adjust the other fuel screw to its highest idle setting.
Lower the idle with the idle adjuster and repeat optimizing the fuel screws until each fuel screw is dialed in.
Now raise the idle to something under 1000 rpm.
If you ended up at 1.5x turns out, your pilot jet is too large.
If you ended up more than 3.5x out, your pilot is too small.
Here’s a link to my full procedure:
http://www.factorypro.com/tech/tech_tuning_procedures/tuning_carbtune,CV,lower_rpm_engines.html
I don’t generally enlarge or add slide damping holes – it makes jetting pickier for installers.
The fit of the needle shims is not important (within limits).
2 shims is about the height of one groove.
I put the needle shims under the clip and adj needle height from there.
Yes and we do make carb kit for your 790.
Marc Salvisberg
415 491-5920
http://www.factorypro.com
[email protected].
Last man standing?
I’m actually looking for all the mods that Randy made. New to me 2008 America. Need to know what the “stock” settings are as I’ve followed the history of the bike from Missouri to Denver … and now I’m moving to Charlotte NC :). I want to jet for ~1000 ft since I am between the blue ridge mountains and the beach … EFI would have been better, but I got a deal on this bike!
HI, I am having trouble starting my Triumph 2001 model, 790cc when cold weather arrives, it also has a poor tick over. I have removed the air induction from the cylinders & removed the electric plug for the throttle position sensor because when connected the bike tick over was horrid. the bike has done 9000 steady miles & when warm runs great. Can you advise or sell me something to help?? Thanks David. 07914585855
Hello David. If I understand your question properly, I believe your main source of trouble is from the Throttle Position Sensor being disconnected. It needs to be connected and working properly for the engine to run right. Without it, the ECU (computer) can’t manage the timing and advance for the engine. See this article from Triumph Twin Power – https://www.triumphtwinpower.com/tps_adjustment.php Once that is sorted out, you should be able to pull the choke out, and start the Bonneville in colder weather… then unchoke it after it has warmed up (1-2 min.) Are the carb heater wires still hooked up as well? If those are unplugged, that may also be contributing to your cold weather issues. I hope this helps.