In an earlier post I mentioned my purchase of the 320mm, 4-piston Brembo front brake upgrade kit. This weekend I was able to start installing it on my 2008 Triumph Bonneville.

Brembo Front Brake Kit: bracket, caliper and rotor
The kit consists of a bracket that bolts to the stock fork housing, the caliper assembly, and a floating rotor that bolts to the stock front wheel hub. You can use your stock front brake lever and master cylinder, plus the stock or upgraded brake line. Mine have already been upgraded to Spiegler stainless steel brake lines.
For spoked-wheel Bonnie owners, you must also remove the lower front fender stay for this modification. In my case, I removed both stays and bobbed both ends of the front fender. You can also replace the front fender with a Thruxton-style or other shortened version.

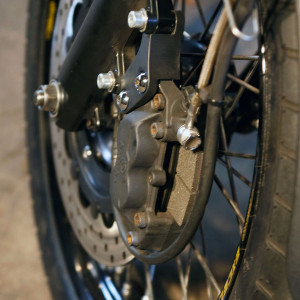
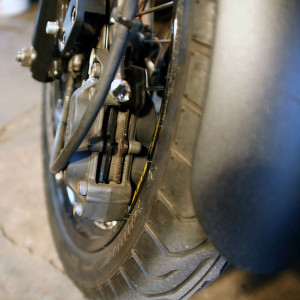
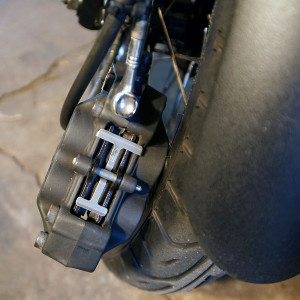
Bracket and caliper mounted on front fork
There are definite advantages of this system over stock brakes, the main one for me being stopping power.
Brembo Kit Performance Advantages
- Stop more than 50 feet sooner (60mph to 0mph) than stock brakes (My main objective).
- Increased life from brake pads – 25,000-50,000 miles
- Full-floating rotor and superior caliper design allow for radically reduced brake noise
- Virtually eliminates off-pedal drag
Brembo Front Brake Kit Features
Calipers:
- Dual o-rings for longer life
- Hard anodized piston bores
- Hard-anodized and polished aluminum pistons for smooth retraction
- Extra deep pistons for stability, even at maximum pad wear
- The caliper pistons move on both sides of the rotor, and apply pressure evenly
Rotors:
- True full-floaters
- Superior cooling
- The rotor “floats,” meaning it moved from side to side slightly
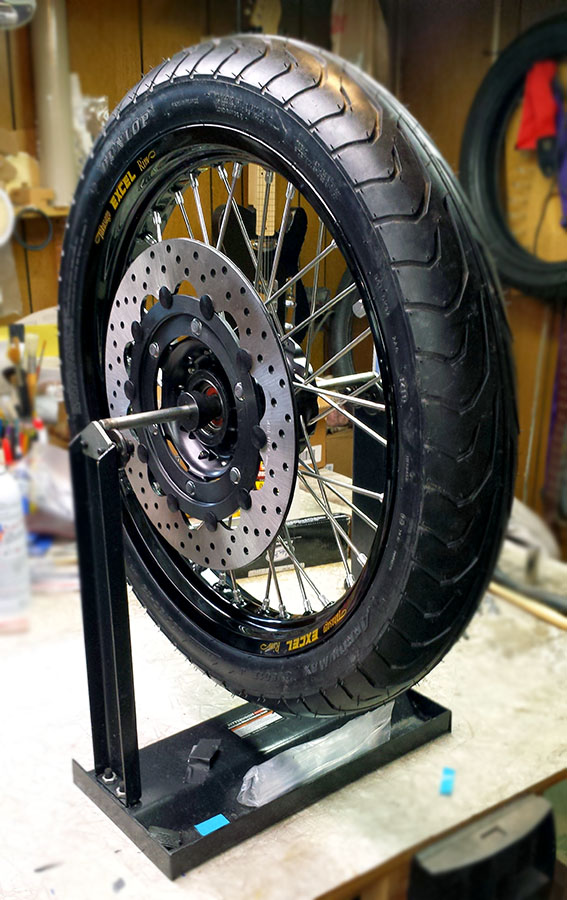
Brembo floating rotor mounted on new front wheel for final balancing
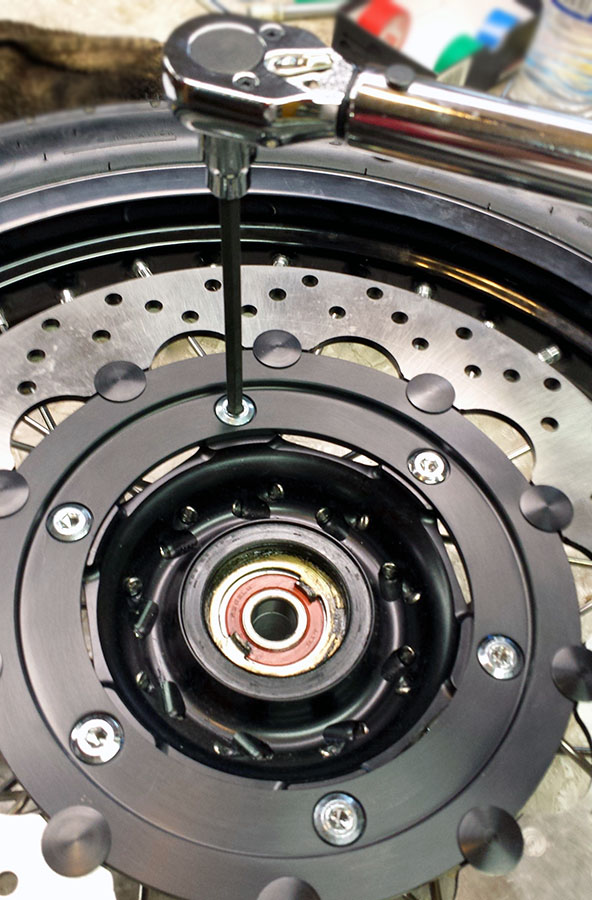
Bolting the Brembo floating rotor on the front wheel hub. Torquing the bolts to the recommended torque.

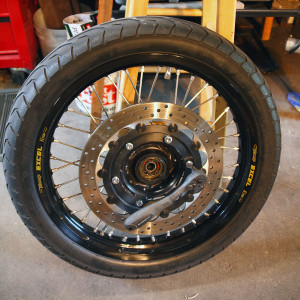
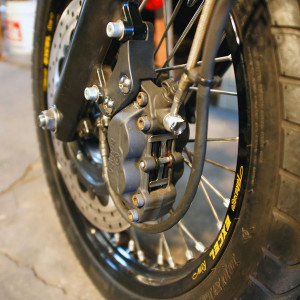
Brembo 320mm, 4-piston front brake kit shown mounted on a 2008 Triumph Bonneville
Customer Experience Update – July 3, 2014
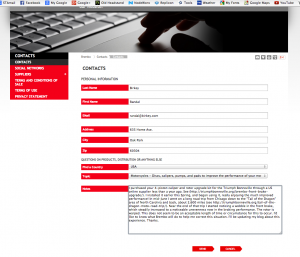
The contact form I submitted to Brembo on July 3, 2014.
In mid June 2014, near the end of my Tail of the Dragon road trip, I started noticing that when I applied my front brake (Brembo 4-Piston Brake Caliper and Rotor Upgrade Kit for Triumph Bonneville), there was a slight vibration I could feel in the hand lever. This situation increased to the point that now there is a noticeable unevenness in the front brake. It grabs more at certain points in the cycle than at others. This indicates that the rotor is warped and no longer perfectly flat. This creates an unsafe situation where achieving a strong, even full braking pattern is next to impossible, especially if I were to need to brake hard on gravel, sand or a wet surface.
I contacted my supplier who informed me that this warping should not have happened with only a couple thousand miles on the rotor… and less than a year old. He encouraged me to contact Brembo directly about it, which I will do today. I first tried connecting with them on their Facebook Page at https://www.facebook.com/Brembo to make my initial inquiry. I discovered that the site is set up so that you cannot post to the FB Wall…. so much for using social media. So, I went to their main website and found the Contact Form (http://www.brembo.com/en/Contatti/Pages/Contatti.aspx) and entered my information and submitted it (See screen shot). We shall see how long it takes for them to respond.
I received an email back from Brembo very promptly the same day (good for them!). They wanted to know where I got the kit as it is not an official Brembo aftermarket product. I let them know that I purchased it from NewBonneville, and am now waiting on their response.
In the meantime, I contacted NewBonneville to see what they may say about this.
Customer Experience Update July 20, 2014
NewBonneville connected me directly with Tara Para at the Brembo Upgrade Kit manufacturer… QTM Inc. in Anaheim, California. Tara shipped a replacement rotor and brake pads to me a few days ago along with a return shipping label for my old rotor and brake pads. They want to check the old parts to see what they can learn about why it warped. This was all done free of charge to me.
I made the rotor swap easily last Thursday evening. The brake pads were a bit more difficult because there were no instructions on how to remove the retaining pin on the Brembo caliper. I couldn’t find anything about this online either. So, I left voice mails with New Bonneville and with QTM. Within a couple hours, Tara emailed me back with the answer!
So, I decided to make sure this question/issue is answered on the Internet!
How to change the Brembo Upgrade Kit Bake Pads for a 2008 Triumph Bonneville

1. Remove front wheel from frame
2. Unbolt 6 bolts holding the old rotor on, and bolt the new rotor back on in its place.
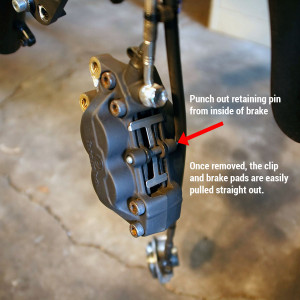
3. Remove caliper from bracket. 4. Remove retaining pin: It is not intuitively clear how to remove this pin.
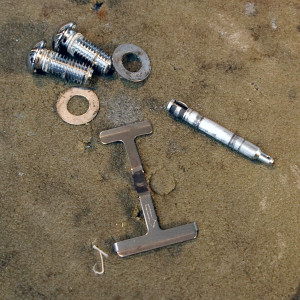
4. Once the pin is removed, you end up with these loose pieces: 2 caliper mounting bolts, 2 shims (in my case), retaining clip.
5. Insert the new inside brake pad
6. Insert the new outside brake pad.
7. Put the retaining clip back in position, and insert the retaining rod back through (outside to inside). Use a small punch to tap it securely into place.
8. Mount the caliper back on the bracket on the fork.
I am very pleased with the performance of the replaced rotor and pads. They now feel like the front brake should… powerful and smooth = safer! I am anxious to ship the old ones back and hear what QTM determines was the cause of the warping.
Did they ever get back to you? I am considering dropping the $800 on this kit, but always wary.
Sergetomiko,
Thanks for your question and comment. I purchased my kit from NewBonneville.com and they did go to bat for me by putting me in contact with the distributor of this kit… http://www.qtmi.com. They did replace the rotor that has warped. I never heard back from them as to why it had failed, but so far the replacement has not warped.
Since then I have come to prefer a different solution that I would recommend you look into as an option. The Pretech 6 piston billet caliper works with your standard rotor, or with a replacement floating rotor like the EBC Pro-Lite. It also mounts on your stock caliper mounts without the need of a separate bracket. You can purchase it here: http://bellacorse.net/shop/brakes/pretech-6-piston-billet-caliper/ and here: http://bellacorse.net/shop/brakes/ebc-pro-lite-semi-floating-rotor/
If you want to go with the very best, I would recommend the Beringer solution, available from Bonneville Performance here: http://bonnevilleperformance.com/product/front-brake-4-piston-caliper/
Good luck and let us know what you decide and what your experience is.
Randy
I’ve had 3 bikes with warped rotors from about 15 bikes i’ve owned. Every single time it was Brembo brakes, I’ve never had these issues with the cheaper ones. On the Speed Triple and Monster 1100 they were brand new so replaced under warranty, on the Superduke 990 I replaced them and they aren’t cheap.
Do you happen to have torque settings for the bracket bolts? Also, do you know which replacement pads will fit? I bought my bonneville with this upgrade and don’t have any info on it. I may want to take off the caliper to clean the pistons and make sure everything looks good in there! Thanks for posting this process!
Sri,
Thanks for your comment and question. I do not have the torque settings for the bracket bolts. However, if you contact the manufacturer of this conversion kit as listed in the blog post (QTM, Inc.) I believe they can supply that information. I describe how to change the pads in my post. I would contact NewBonneville or QTM about replacement pads as well. Good luck!
Thanks so much for the reply, Randy. I’ll look into contacting NewBonneville/QTM!
Hey Randy, just an update. I got Brembo replacement pads from QTM thanks to you! Now, I cannot figure out how to get the pin out once the little wire safety piece is removed. I tried punching it out with it still mounted but I think I’ll have to take it off of the fork mount to get better access and not a bad idea to get some brake cleaner into the caliper. Any thoughts or advice on this? Thank you!
Hi guys.
can you tell me de reference of the brake pads in this kit?
Thankx in advance
Hey Manuel, if you contact QTM in California, they will ship you the proper pads for this kit. Brembo Front Brake Torque setting is 30ft-lbs.
The place I purchased my Brembo kit may have information on where to get the replacement pads. Try https://newbonneville.com/shop/brembo-rotor-and-caliper-brake-kit/ The pads are Brembo part #500-4000 for about $50.
Do you know the piston size of this kit? I want to buy matching Brembo levers m/c for the same kit.
Peter, no I don’t. I purchased this Brembo kit from Newbonneville.com. The kit is put together and supplied by QTM in California. I recommend that you contact either of them for more information. Since this article was written in 2014, I have upgraded my front brake components and controls to Beringer, purchased from Bonneville Performance. These are by far the best brakes I have ever experienced on a Bonneville!