Re-jetting the Keihin CVK Carburetor
As I have shared in earlier posts, I’ve had to learn about re-jetting the stock Keihin CVK (36mm) carburetors used on the 2008 Hinckley Triumph Bonneville because I modified the air intake and exhaust system. To take full advantage of these performance modifications, the stock carbs need to be able to breathe more freely to allow for extra airflow.
Recently I decided to switch my carb needles back to the stock Bonneville, after installing and testing Thruxton needles for a month or so. Here are some photos I took during the process to help you understand the process better.
Step One – Preparation
I jacked up the Bonneville on my floor motorcycle jack. I removed the seat, side covers, and then the gas tank. Next, I removed the carburetor brace provided by British Customs in their Airbox Removal Kit.

British Customs Carburetor Brace
Step Two – Removal of Carbs
I disconnected the wires attached to the bottom of each carburetor. This was followed by loosening the hose clamps attaching the carbs to the intake manifolds… in my case the TPUSA billet manifolds. This allows the entire carb assembly to come off the engine and can be turned sideways on the left side of the bike. I found that a 2×2 wood placed between the transmission case and the carb assembly works well at holding it in place.

Carburetor Assembly Disconnected and pulled sideways, resting on wood block
Step Three – Carb Bottom Adjustments
The next step was to remove the bottom float bowls. I use a 3MM hex wrench because I have replaced all the stock Philips head screws with Stainless Steel ones from New Bonneville. These are much more rugged than the stock screws and allow for multiple on-off cycles without stripping. I use an old towel below the carbs to soak up the gas that spills out of the float bowls when these are removed.

Removing S/S float bowl screws using 3mm hex
Here are a couple of views of the carb bottom with the float bowls removed and call out to the various adjustment locations.

Bottom view with float bowls removed
Here’s another view of the carb bottom with the float bowl removed.

Another view of carb bottom with float bowl removed
Once this was done, I was able to access the main jets, pilot jets and idle mixture screw to install the sizes and settings I wanted to test. In this case, I was only changing the pilot jets from size 40 to size 42.

Here’s what the Keihin pilot jets look like

Installing the pilot jet with a small flat end screwdriver
Then the float bowl is reattached using the same s/s screws.
Although the idle mixture screws I have can be adjusted when the carbs are fully mounted, I prefer to adjust them at this point using needle nose pliers with some tape to protect the brass. In my case, I was following the recommended 2.5 turns out.

Adjusting the idle mix screws with a needle nose plier.
Step Four – Carb Top Adjustments
Now it is time to address the top of the carb, and in my case replace the Thruxton needles with stock OEM Bonneville needles.
First, you remove the 4 screws holding on the diaphragm cover. It is important to know that you must hold the cover down while you loosen the last screw or the spring inside the carb may push the cover off unexpectedly, and you may lose or damage a part.

Removing top diaphragm cover with 3mm hex
After the diaphragm cover is carefully removed, remove and carefully store the spring. Now it is time to remove the vacuum piston. I discovered that an easy way to do this and avoid damaging the rubber diaphragm is to insert a finger into the center hole until snug, then left the entire piston straight up and out.

Vacuum piston with diaphragm cover removed.

Vacuum piston shown half way out.
Once the piston is out, I removed the Thruxton needle and replaced it with the stock needle. In my case, I also left 1 shim on the needle. Here are the parts laying on my work bench.

Top carb parts
Once the needle was replaced, I inserted the piston back into the carb using the single finger method again. Notice in the top view of the carb (below) where I have indicated the hole where the needle will insert into the center of the main jet tube that was installed from the bottom of the carb. As the piston floats up and down, it raises and lowers the needle inside this main jet tube. This action is what regulates the gas flow into the carb.

Top view showing main jet tube inside where needle inserts
After the piston is back in place and seated correctly all the way around, it is time to reinstall the cover. Make sure you remember to tighten the 4 screws down the same amount. If one is a little loose, outside air will be pulled into the carb and it will run lean, causing the engine to not run correctly.
Here’s an exploded view diagram of the Keihin CVK carb for additional reference.

My Keihin CVK Carb Settings
I hope this description and my photos will help you in your Triumph Bonneville Keihin CVK carb modifications and adjustments. Let me know your experiences.
WOW great stuff man, thanks. I am a novice. This is well done.
So…. I’m in way over my head but can I just clean the clogged jets on my 06’ Thruxton and get away with hopefully being able to put it back together? It sat for 8 months with unleaded after a minor accident, neighbor tipped it over by backing into it with his car. I am hoping this was the reading my bike would only start, idle roughly and then stall when I tried to give it gas. Before this everything was tip-top! I would barely ride a few days a week.
Gil, In my experience, whenever these Keihin CVK carbs are left to sit with modern gas (especially if it contains ethanol) in them over a long period of time, the impurities in that gas tend to clog up all the tiny orifices and pathways in those carbs and render them inefficient or inoperative. In my experience, this condition requires disassembly of the carbs and thorough cleaning of all those potential pathways and orifices including the main and idle jets. I use spray cans of carb/parts cleaner, compressed air, a parts washer, and small dental style picks, wires, brushes, and tools for this purpose. I have always been able to get the carbs working correctly again given time, thoroughness of cleaning and replacement of necessary parts. There is no reason to ever throw away a carb unless it has been physically damaged, cracked or improperly modified. If you keep at it and learn about these carbs in the process, you can prevail!
If your bike was truly running fine before the tip-over, and nothing else was damaged, then getting the carbs cleaned and set back to factory standards should be all that is required for your bike to run well again.
Here are some of the tools and resources I use:
https://www.eastwood.com/eastwood-3-5-gallon-benchtop-parts-washer.html
https://www.harborfreight.com/catalog/product/view/id/13162/
https://www.harborfreight.com/pistol-grip-blow-gun-63568.html
https://www.harborfreight.com/mini-pick-and-hook-set-63697.html
https://www.harborfreight.com/19-oz-crc-brakleen-brake-parts-cleaner-62229.html
https://www.amazon.com/gp/product/B07Q56HGHX/
http://www.sudco.com – for ordering Keihin CVK carb parts and rebuild kits
Here is a post I wrote on this topic in the New Bonneville Riders forum: https://newbonnevilleriders.com/forum/threads/2004-t100-carb-problems.203613/
Here is a pretty good overview video on cleaning carbs (although not your specific carb): https://www.youtube.com/watch?v=3FmfO-mWv3Q
If you truly are overwhelmed and cannot tackle this on your own, your only option is to find a mechanic, dealer or repair shop that has this experience and can do this work properly for you.
Good luck to you!
Randy
Hi,
I have a bad back fire/ Mis fire and rough idle on my 2006 T100 Bonneville. Also found fuel in my air box. Looking to replace the Float valves. Anyone seen this before? I’m in Savannah GA where Humidity is a killer
Can anyone recommend where I can purchase Float valves?
Hello Chris. Thanks for your comment and question. Living up in the northern states I do not have any experience with constant high humidity like you may have in Savannah. I’m not sure what effect that would have on your carbs or this problem you are having. If you have gas in your airbox, I suggest that you should just remove, disassemble, clean, and rebuild your Keihin CVK carbs. I have purchased carb rebuild parts from Sudco International, eBay, and Triumph parts from BikeBandit.com. I believe your float valve kit is Triumph part #T1241077 and the float bowl gaskets are #T1241036. I would make sure that all of the jets, needles and other gaskets are in good shape while you have everything apart. I use compressed air, carb cleaner, carb cleaning brushes, and even an ultrasonic cleaner to clean and rebuild carbs and carb parts.
Hi there Randy, I see you’ve done some more dialing in on the carburetors on your bike?Wondering how you find the results? I was also thinking of Thruxton needles but see you’ve changed them back to the std needles?
All up now, how are you finding the jetting combination of your bike? Your a few steps ahead of me here seeming there seems to be nobody carrying carburetor parts for these Kehins down here in New Zealand. BC seem to have a limited sized jet supply and the Dynojet Kits are designed to run with the stock airbox.
My bike still isn’t right but runs better on the open road since my modifications. Would love to get it properly sorted. If I could find someone with a Dyno that understood carburetors I’d have it sorted straight away.
Look forward to hearing any positive results you may want to share.
Cheers, Pat Reardon
Hey thanks for the diagram. I own 2008 bonneville. It has been sitting in my garage for 2years. Now I am having a problem. I figure I need to clean a carburetor first. Can you advise me how to clean it?
thanks,
Saehwan
Saehwan,
I recommend that you purchased the Haynes Triumph Bonneville manual, and follow the recommended procedures for removing, cleaning, calibrating and re-installing your carbs. It’s more complex that I can describe in a blog comment.
Here it is on Amazon: http://www.amazon.com/Triumph-Bonneville-Speedmaster-Thruxton-Scrambler/dp/184425917X/ref=sr_1_1?ie=UTF8&qid=1361136928&sr=8-1&keywords=triumph+bonneville+manual
Randy
I have gotten the Pilot Jet spring assembly stuck inside the carb. Any suggestions on how to get the spring and washer out?
Ahhh, this happened to me once also. I believe that I just used a sharp thin ice pick type of tool to carefully straighten and tug the spring/washer out. A small needle nose plier might also be helpful. I remember that I did remove the carbs from the engine to get at it better. Hope this helps! It’s a pain, I know!
I have a 99 Triumph Thunderbird with three carbs similar to yours in the demonstration. I have taken the three carbs out twice to cleaned them but the left carb backfires at less than 2,000 rpm. I know it is only the left carb because it goes directly to the left exhaust pipe while the other two go to the right exhaust. Idling is a little rough as well. Above 2,000 rpm the motor runs fine.
Any help will be greatly appreciated.
Robert,
I don’t have experience with your year and model of Triumph or version of the Keihin carb. It may be possible that you need to do more than clean the carbs to fix this problem. You may need to check things like the pilot and main jets, float levels, carb synchronisation, and for just any part that has more wear than the others. Do you have a manual (I use a Haynes Manual) for your bike and have you followed those steps for checking and cleaning the carbs? Do you have a carb sync tool?
Randy
hello Robert, im having exactly the same problem with my 2002 thunderbird. its really got me snookered! if you rectify yours can you please let me know what it was. many thanks cameron.
Cameron, I will let you know sometimes next week as I am in the process of putting the carbs back on but I only work on the bike a few times a week when I have time. Robert
hello robert
thanks for your swift response. my last eureka moment was when i realised that one of the OE jubilee clips on the offending cylinder had “bottomed out” and couldn’t be tightened any more which would lean out the mixture. so i stripped out the carbs once again and changed the clips for readily available 13mm wide clips……. still no go! truth be known its now worse so ive know ordered some 8mm wide clips which will properly fit in the grooves of the rubbers.
n.b. im 100% positive that the carbs are rebuilt correctly and the only thing to do is set the balance…….once it runs consistently.
cheers for now .
cameron
Are you balancing your carbs as a final step as well? You will need a quality sync tool, they cost around $85 USD.
Yes, good point. I have tried 2 different carb sync tools, both by MotionPro. One is called the SyncPro and uses some kind of synthetic liquid material, and the other is called a RacePro and uses real mercury. Both are available from NewBonneville.com and other online sources. http://www.motionpro.com/motorcycle/partno/08-0411/
Randy
Balancing was never an issue with me becasue all three carbs are held together by a metal rod that goes the link of the cars. My problem is I consider the 99 Thunderbird as new since it only has 7,000 miles After it dawned on me that rubber and by products stiffen over time which caused me to not be able to put the three back into place. After I put new rubber intake manifolds and the rubber piecve that attaches the carb to the filter they fit right back in and I have had no problem since.
Remove the float bowl area jets (2) and then clean the 2 small holes on the intake side of your carb with tiny 1mm or smaller drill bits. Use a spray can of contact cleaner with the straw to blow out the debris. There is also a small hole on the engine side of the carb; use the same procedure above to unplug it. Remove the idle mixture screws before using the contact cleaner. Gas varnish seems to plug up these holes if the motorcycle is stored / not used for 3 or more months.
Very informative many thanks,
i have a 2007 T100 and want to change the main jets…. My tank has no fuel tap to drain it down, any clues.
Regards
Keith
Keith,
A stock T-100 should have a shutoff valve where the fuel line exits the tank and goes down to the carbs. You would turn the lever so it is 90 degrees to the fuel line. If you look close it should even say on it what position to close it.
It should be visible on the left side Near the rear of the tank just above the carbs.
If you don’t have it, then someone has altered it from stock. You will need to get an actual petcock valve either from Triumph or an aftermarket one like a Pingel.
Let me know if this helps you locate it.
Randy
Thanks, all sorted now.
I have 06 scrambler , Hyde after market pipes and Piper filters . My problems is coming out of bends it seems to hesitate in getting the power on ?
It seems we are all at one time or another having carb problems. My 2005 Thruxton was left untouched for a while. Started after charging the battery but ran only on one cylinder. after stripping the carbs, I found our dreaded enemy, corrosion! It was a real challenge because when all together again, the other cylinder failed! I must have had the carbs on and off ten times. Finally it is moderately reliable once again, but I have ordered the re-jet kit from Thunder bikes NZ, I have standard filters. My thought are that the corroded jets were really not retrievable. Great site this hope to see more. Mike
Michael,
Thanks for sharing your experience. How long was your Thruxton sitting unused? Was it stored in an unusual setting… high humidity, rain, etc.? I am trying to understand the corrosion… how that could have occurred. But, I agree, once corroded, it would be best to clean and re-jet the carbs as well as replace the needles. Those parts on a Keihin CVK need to be very clean and fresh.
Randy
Just celebrating a happy ending.
After a lot of head scratching and soul searching I bit the bullet and stripped out the crankshaft position sensor. It turned out to be a GILL component. These are renowned for their unreliability. The coils turned out to be the same. So they were all replaced with PVL bits and now she runs like a train! SPRINT MANUFACTURING of Warminster deserve a mention as suppliers of fine components. Both reasonably priced and swiftly delivered.
Thanks everyone ….. now where’s me helmet?!
I have learned that the Hinckley Triumphs fuel system impacts the exhaust and air filters. Changes or modifications do not work well. I think this discussion started with questions about servicing the air filters and Keihin carbs for my 99 Triumph Thunderbird. I talked to the dealer about changing the air filter set up he said you could install three separate filters but the re-jetting and changes to the Keihin Carbs would be cost prohibitive. I discovered that the flexible plastic(?) intakes from the air filter to the carbs and from the carbs to the cylinders had hardened. It was a piece of cake putting the components back together with new intakes. The sir filter fit perfectly to the carbs and the carbs to the cylinders. Foolishly, I spent hours trying to reconnect everything before I realized the rubber intakes had hardened.
Thanks Cameron for your update. Always good to hear from our friends in the UK! I hope you found your helmet! 🙂
just one last message before i head off. one of the things that i found during the dozens of times that i removed the carbs was that the airbox has been badly designed. it overly stresses the carb mounting rubbers. these should be fitted wide side up. i modified the air box by taking about 10mm from the topside of the guide for the frame bolt to slide into, at the rear of the box.there is a moulding that helps with the size. this allows the box to sit lower and also locks the box forward in its intended position. hope this helps. cheers for now.
Randal: Enjoyed your post. I have been through this on my 900 Sprint w/Mikuni’s. Did the airbox removal, re-jet and big pipes. Now I just bought a Bonneville last week. Looks like about the same routine. Mine has Sayintune pipes and is a bit lean.Thanks mostly for the photos so I know where I am going. Have to order a manual this week too.
Jim,
Welcome to the Bonnie Club! Contact Bill Gately at Bonneville Performance to get yourself a nice Mikuni 42mm carb conversion kit and lots of support. Those Saintunes look almost identical to my Predators, so you should have a very similar setup and experience to me. Let me know if I can help!
Randy
Randy: Put my gauges on the America the other day. Everything seems to be well adjusted there. I checked idle mixture and found it’s problem. Left carb was 4 turns whole the right was 1/2 turn ! Set a them both at 2 1/2 & itseems a little lean at low speed. Went up to 3 turns with out much change. Pops a lot on deceleration. (no exhaust leaks). My thinking is larger pilotjets. What do you think ? …J.D.
Jim, I’ve been told and have read that some minimal popping is normal, especially on aftermarket exhausts. Bumping up the pilot may help and is certainly worth a try as long as you don’t mind the possibility of going back to the size you have now after you compare the performance of the two sizes. I’ve found that adjusting carbs requires a lot of trial and error to get things just where you want them. Your former idle mixture settings were certainly not helping… Wow!
Went through this when setting up my 900 Sprint that has a set of Micron slip-ons. Tuned it out to just a sweet “growl” when you get out of it. Nice but not enought to drive the neighbors nuts.
I have a 2003 T-100 that (I think) has been running a bit lean. Going to use this guide for changing the jets on mine too. Do you need replacement gasket sets for the float bowls?
Scott, I don’t think you need to replace gaskets on the float bowls because they are rubber seals that sit in groves machined into the surfaces. Unless those are really bad and deteriorated, you should be fine. The part is T1241036… #14 in the diagram.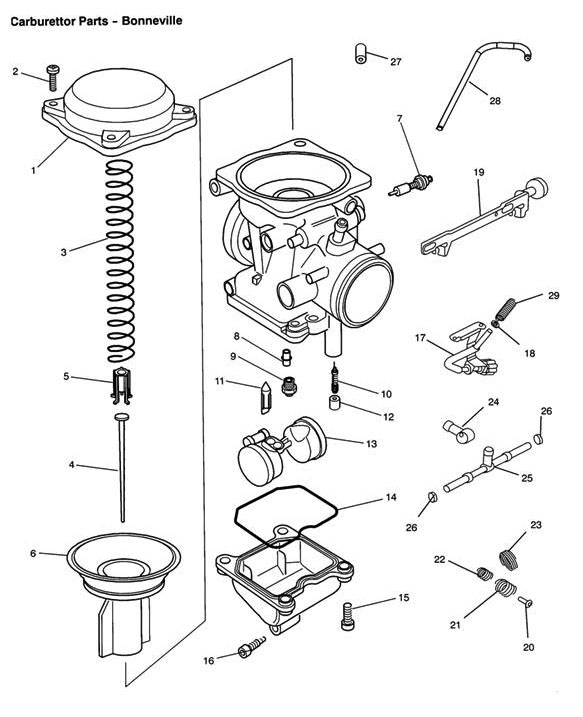
Thank you Randy! I’m actually from the Chicago area too, I’ve probably seen you around at MCC, Motoworks, or Morrie’s Place, if you head that far North. Very nice page you have here! I’ll have to check it out in more depth when I get home. I love my Bonnie, just a few minor things to do with it, carbs and next is changing the leaky front sprocket seal.
Scott – great, glad to help. Let me know if there is anything more I can do to help.
Just a note your description of the diagram, there is no pilot jet shown in the diagram, it only shows the pilot (slow running) adjustment screw (10).
Johnny,
The pilot jet (#10 in the diagram) in not an adjustment. It is a brass fitting that screws all the way into place and fits solid. There is no adjustment to it. The way you “adjust” the pilot is by changing it to a different size. In this diagram I am showing a size 42 pilot jet. You can get them in many other sizes.
Hope that helps.
Randy
Then i suggest you read the triumph parts book .and the manual.
10 2 T1241076 KIT. PILOT SCREW
12 2 T1240955 PLUG. PILOT SCREW
#10 is for adjusting the fuel flow when on pilot jet ( also know as slow running mixture screw ) its used to adjust your mixture when on idle or low revs , or before your on main jet the thing below is a blanking plug set from the factory .
The (mixture screw) is determined by its position on the carb , if it s at the front ( head side ) its fuel mixture and if its at the rear (air filter ) then its a air mixture screw .
Hope that explains it a bit better for ya ..
PS: 45 yrs working as Qualified motorcycle mechanic.
Hi There , i think Johnny may be right , i asked my dealer and he says the parts book dosent carry a pilot jet ,only a main jet and faxed me this .
I can only see the pilot srew kit .
Carburettor Parts – Carb Assy T1245050 T1
Ref. Qty Part Number Description
1 2 T1241070 COVER. DIAPHRAGM
2 8 T1241071 SCREW. DIAPHRAGM
3 2 T1241072 SPRING.VACUUM PISTON
4 2 T1245051 JET NEEDLE
5 2 T1241023 SEAT. PISTON SPRING. KEIHIN
6 2 T1241019 VACUUM PISTON. 3mm HOLE. KEIHI
7 2 T1241074 KIT. CHOKE VALVE
8 2 T1241025 NEEDLE JET. KEIHIN
9 2 T1241075 MAIN JET. 110
10 2 T1241076 KIT. PILOT SCREW
11 2 T1241077 KIT. FLOAT VALVE
12 2 T1240955 PLUG. PILOT SCREW
US & TW Only
13 2 T1241078 KIT. FLOAT
14 2 T1241036 SEAL. FLOAT BOWL. KEIHIN
15 8 T1241035 SCREW. FLOAT BOWL. KEIHIN
16 2 T1241034 SCREW. FLOAT CHAMBER DRAIN. K
17 1 T1240131 STOP SCREW COMP
18 1 T1240132 WASHER
19 1 T1241009 SCREW. CARB SYNCH. KEIHIN
20 1 T1240133 LEVER
21 1 T1241010 SPRING. CARB SYNCH SCREW. KEIH
22 1 T1241011 SPRING. CARB SYNCH. KEIHIN
23 1 T1240143 SPRING
24 1 T1240144 T-FITTING
25 1 T1240157 T-FITTING. CARB ASSY
26 2 T1240158 U-RING. CARB
27 2 T1241012 CAP. VACUUM CONNECTION. KEIHIN
28 1 T1240161 RUBBER TUBE
29 1 T1240162 SPRING.IDLE ASSY
Cheers………Joe.
Hi all, I have a 1998 TBS. My problems are when its cold, it starts fine but misses and splutters until after about 10kms. When it warms up then it improves a bit up til 3000 rpm then over 4000 rpm it runs fine with lots of grunt. Any suggestions? Thanks, Mike
Hi Mike,
Thanks for posting on the website. Unfortunately, I don’t have any experience with Bonneville’s before the Hinckley’s starting in 2001. You might try posting at TriumphRAT.net… I’ll bet someone there will have some advice for you.
It does sound like you may need to clean and adjust the carbs.
Randy
Hi there, just a quick question. Last year the local Triumph dealer fitted an Arrow 2-1 exhaust to my 06 Scrambler. I ran the bike all last summer until early November. I put the bike away as I have in previous years, ran the carbs dry, left on an Optimate. Started it up the other day to take it for its MOT and when I came back to the bike after putting my gear on the exhaust headers were glowing bright red. Airbox is standard with Triumph filter. Just wondered if you could shed any light on my problem?
Mike,
Sorry, I don’t have any experience with this issue. It sounds serious though as I have never seen a glowing red pipe on any Triumph… even racing bikes. I would definitely have the dealer check things out.
Randy
Thanks, I’ll get my local guy who does my MOT to have a look. He used to build race bikes and knows a bit more than my local Triumph spot.
Mike,
Got an 07 Bonnie that I thought was running too lean. Took it to the dealer and dropped lots of bucks. Dealer test rode it and said ‘running great’. And it ran fine just too lean for long life of hot parts. Slow to warm up to operating smooth. pipes blued down to the horizontal runs, RED hot pipes 4 inches down. From my experience in the ‘old’ days it is running lean. Got a Dynojet kit for the carbs and putting it together now. I love the bike and it is for occasional fun or parade rides only. Been many years since I did flat track and was dealing with carbs daily BUT I think I remember more than some of the new techs ever learned.
I think I have mine corrected. Will let you know when I am all tuned with free flowing pipes and snorkel removed. Good luck with yours. A good cleaning will probably give enough fuel flow to run cooler. A good reason to run rich.
Bobby
Hi Randy, Long time since I posted here. But last bit of your reply, I answer now; With the bike on the side stand, and in this position for months not properly covered I found in horror the air box full of water! Submerging the air filter ( standard at the time ) by 1/4.! That accounted for the corrosion. since those days several years ago now the bike runs really quite well; Standard air box but KN filter, home built ram air stack ( No snorkel.) Dyno-jet needles forgotten the main jet size! But 40 pilots 2.75 turns on the mixture screws. It pops like billy-oh on over run. So I thought I would try your set up with 42 pilots. ( I will check what main jets I have on then. ) I will bear in mind that I still run the stock air box. Any other thoughts?
Mike,
You might consider removing the baffle that is inside the airbox for a bit more airflow. It requires taking the airbox off the bike, removing one side (about a dozen screws)and sliding the little piece of plastic out, and putting it all back together again. I guess they put that in at the factory to meet export air quality standards, but it restricts performance. Let me know how that goes.
Randy
air box does not need to be removed for the baffle to come out ..just remover the side cover , screws .. loosen the box mount bolts to jiggle around to get at screws … everyone for the last 14 years knows this ..
Hi Randy, just wondering why you changed back from Thruxton needles to stock needles? Are you still using 42 pilots and 145 mains without issue? Just wondering if you ever got your bike dyno’d afterwards. All the best
Stephen,
Thanks for your comment/question. It has been a number of years since I wrote this post. Since then I went on to replace the stock carbs with Mikuni flat side carbs from Bonneville Performance. To the best of my memory, I went to Dynojet needles because I got the best overall performance with them using the stock carbs with my particular intake and exhaust setup. Every bike is going to vary depending on how much you have opened up the air flow intake and the exhaust. The morte the engine breathes, the more you’ll need to adjust the needles and jets. I never did dyno the bike with the stock carbs.
More recently I have had the entire engine rebuilt by Bonneville Performance and bumped it from 856cc to 1100cc. When I get the bike all back together and running again, I’ll dyno it and see where I am… probably somewhere in the 90-95 HP range.
Randy
Thanks for your reply. I’m still on the stock carbs with Predators, 42 pilots and 142 mains around sea level. My A/F and bhp curves were ok, nothing amazing. I’ve recently wondered whether it would be worth trying Thruxton needles and was curious as to why you went back to stock needles. I’m not ready to go buy new carbs yet though! But 90+ bhp sounds pretty nice with the big bore. Would be interesting to hear your results.
Cheers,
Stephen,
Just to clarify, I believe that I got the best performance with the Dynojet needles. Keep watch on this post for updates on the new engine: http://triumphbonneville.org/taking-a-triumph-bonneville-865cc-engine-to-1100cc/
Randy
Hi Randy – My 2008 Scrambler that is typically stored for 4 to 6 months at a time suffers from backfiring and poor idle when restarted. The dealer says it is the CA gasoline. He cleans the carbs and it runs fine until I store it and then the problem starts all over again. Any suggestions ? – Thanks for your help. Tom
Tom,
Thanks for your comment and question. I guess my first question would be… do you stabilize the gas when you store it? If there is ethanol in the gas (like there is here in Illinois, E10), it will cause these problems if you don’t put an additive in the gas while it is sitting, and you should fill the tank as well to prevent condensation build up. You should also run the engine after the stabilizer has been added so the stabilizer gets down into the carbs, bowls, etc.
There are threads about this on Triumphrat.net with more details.
Hope this helps…
Randy
Mike l just had the same thing happen the pipes got so hot they caught my pants on fire. I am now in the process of pulling the carbs apart. Did you find out what was wrong. Paul
I bought a 2005 Bonneville. I had to split the carbs apart to get them off the bike due to the way the wires were routed. When i went to put it back together I found a spring left over that I have no idea where it goes. I can email a photo if that would help. Thanks, Jim
Jim,
Sure, I’ll connect with you via email.
Perhaps this diagram will help.
Randy
Hi Randy, would you say you could remove the carbs amd place the. on their side like you did without having to remove the gad tank? Also the idle mixture screw is 2.5 turns out stock isnt it?
Hi Randy,
I own HD sportster xl 1200 sport ,1997 .
I will rebuilt my CV 40 carburetor , I need your advice at :
1- what is the best brand for carb rebuilt kit ?
2- I already replaced stock air filter by screamin eagle stage 1 XL high flow K&N(PN#29400026) & also replaced the stock exhaust by V-twin one (Radi-Dual 1-3/4″ J&P PN#: 441-145 )
So, this is the case what shall I do with main&piolt jets ??? Should I changed it or keep it the same size .
Thanks in advance .
Regards ,
Bassem
I need to change my pilot and main jet. Can I get the carbs to turn to the side to get to them like you did without removing the fuel line and tank?
Randy
I have a 2005 800 Bonneville it didn’t get driven for two or three weeks, went for a ride and fuel pouring out of the carbs. Removed carbs cleaned bowls, checked needle and seats, float level looks good but no idea what the spec should be. Reassembled turn on fuel, and it pours out the throats. Any ideas?
Hi, i have a 2007 865 Bonnie. I bought it with Norman & Hyde exhaust and installed a free flow k&n filters. I never liked the power across all rpm so i opened up the carbs yesterday and noticed the main jet is `135` and pilot is `42`. I put one shim in the needle and it feels better but still not great. I don’t know how many turns the pilot has since i dont have a tool. I also plan on removing the snorkel and installing a 19t front sprocket. Is there any recommendation on what main and pilot jets i should be using? Any help is appreciated. Thanks.
Hi Randal
I have a 2007 T100 with British Customs Sleeper slip on pipes.
This weekend will install a British Customs Airbox kit with KN cone filters . I plan to use the “performance jets” that came with the kit.
While I have the carbs off and open should I do anything else to them? Full cleaning? Balancing?
She has been running rough at low RPM
Dave,
I assume you have purchased this kit: https://britishcustoms.com/collections/bonneville-carb/products/air-box-removal-kit-bonneville-thruxton-carb
The online description does not say what size jets are included. My guess is that with the sleepers on the exhaust side and the increased airflow on the intake you will need to at the very least start with size 142-145 for the main jets and see if the engine will pull well all the way up the RPM’s. If you start with a 142 and it seems weak or hesitates, then try the 145’s. Once the main jet size is established (yes, this may mean taking the carbs on and off several times), and if the idle is still rough, I would then try the size 42 pilots and see if that improves things. Otherwise, stay with the stock size. It is possible that raising the needles (with one spacer) or using Thruxton needles may improve things slightly, but it is not absolutely necessary. The “balancing” would be accomplished when the carbs are on the bench, by turning the needle jets all the way in, then back out 2.5 turns each… which would be your “bench balancing”. After the bike is running, you “might” need to adjust those needles a small amount to smooth things out, but most likely not. I’ve never experienced the carbs to be significantly different in balance using this simple method.
If it was me, I would do this whole process by carefully removing and disassembling both carbs, keeping track of and protecting all the small delicate parts, blowing out every passage and crevice, using carb/parts cleaner to remove all residue, and replacing any worn or used gaskets, o-rings, etc. and then rebuilding. This will produce the best chance for performance and reliability over a longer period of time.
Good luck – let us know how it goes!
Hi Randy,
Airbox removal was smooth and relatively easy.
The carbs came right off and I stood up on the left side of the bike as suggested.
Ended up going with 140 main and 42 pilot jets. My bike runs great, smooth across the rpm range.
Wish I had done this a while ago.
Thanks for the help.
Dave
Also the idle mixture screws were set at 3 turns out so I adjusted that to 2.5 turns.
Thanks for the great info.
l have Speedmaster 2006 and I lost one of the two ’emulsion tube’ when l was cleaning the carb. Can anyone tell where can l get one. Also my battery cover is lost/misplaced. Pls help me. Im in Cape Town, South Africa. Thanks.
Hello Sam,
This site is not affiliated with Triumph Motorcycles or any Triumph dealer. We are all owners, customers, enthusiasts just like you. You can obtain parts for your 2006 Speedmaster from any number of online Triumph parts sources around the world. I most often use BikeBandit.com, here in the USA. Most of these sources deliver worldwide. You can also get or order parts from a Triumph dealer. There is one in Cape Town, S.A. and you can find contact info here: called https://www.triumph-motorcycles.co.za/dealers/south-africa/cape-town-mike-hopkins-mc
Hi Guys,
The comments about the Hinckley triples carb mixture adjustments – a little tip when setting up – the middle carb gets a lot hotter than the outer ones, so fuel can evaporate quicker and give a lean mixture to that cylinder. To overcome this, give a stronger fuel mix ratio – 1/8 of a turn is enough. Good quality vacuum gauges are required to synchronize carbs for even throttle openings. We also remove the stock air filter and replace with a K&N filter it lasts a lifetime and makes the engine breath properly. All that is required is to clean and coat with K&N oil. Ride safe! Andy from Waveney Couriers, UK
I have recently picked up my triumph Bonneville from a triumph dealership. It seems like the mechanic has messed around with my carburetor and made it to have issues on me. When I ride it’s like the fuel line is being cut off. I would be guessing the Prad when I ride it’s like the fuel line is being cut off. I would be gasing the throttle and it won’t gas the engine . It would seem like hiccups. Inspecting my engine further I found two screens laying on top of my block. The springs or numbers 21 and 22 on the diagram. Are the springs the cause of my issues? To avoid this hiccuping on the road, my only solution is to open the choke and it stops right away. Please help me understand
Smith – sorry to hear of your troubles. I certainly does sound like the carbs are not setup properly. If you, in fact, did find springs #21 and #22 on top of the block, and they are not actually installed, then I don’t think your carbs could be properly synchronized. This would certainly cause the issues you are describing. I recommend that you return the Bonneville to the dealer and insist that they install those springs properly and synch the carbs so that the bike runs properly. You should not have to choke the bike to keep it running. Where are you located and what is your Triumph dealer name? Good luck!
Excellent post and pictures. I have a 2008 scrambler with leaky carbs. Best I can tell it is the float bowl seals leaking. I have pod filters so carb removal should be easy. Bike runs perfect, just an annoying gas drip if I don’t shut off the petcock.
My question is would you bother tearing the carbs down or should I just replace the bowl Orings first to see if that stops my leak?
Reuben, Thanks for your comments and questions. If it was my bike, I would remove the carbs and do a full cleaning and rebuild including gaskets, o-rings, jets, checking the float levels, etc. That way, you eliminate all the possibilities and ensure another 10 years of riding with minimal carb issues. When I buy older used bikes as project bikes, I do this as a matter of course… especially if they have been sitting for any significant period of time. You can certainly start with the bowl gaskets if you want to just eliminate the most simple possibilities, but I would just go all the way, personally. Best of luck to you!
I may be struggling a little on interpreting the diagram. Based on my experience of pulling apart my carbs, when I removed the Main Jet, the jet seemed much longer than the jet in the diagram. I am needing to replace the jet so I am trying to ensure that I am purchasing the right size. Has anyone run into this issue?
David, Thanks for your post and question. It sounds like your main jet may have been so tight that the tube it screws into came out with it. The main jet unscrews from the brass tube that has a hex end. This tube goes up into the carb and extends slightly into the intake airway. The needle end actually slides into this smaller end when the carb is in idle. You may need to put a wrench on the hex end and then unscrew the main jet from the tube. The tube can be cleaned and reinserted into the carb. You can then inspect, clean and/or replace the main jet. I hope this is helpful. Randy
BTW – This photo shows what happens to these carbs when they are left sitting with ethanol gas in them for longer periods of time. The ethanol gas turns into a gummy mess that will mess up these carbs big time! Every drop of gas needs to be emptied from the carbs if they are not being used regularly. Or, some stabilizer needs to be added to the gas tank, and then the engine run long enough so that the stabilized gas fills the fuel lines, and carb bowls. No unstabilized gas can be in the carb or this will happen!
I finally found Bonnie Shangri-La! Thank you!
You are welcome! Thanks for your comment!
2007 Bonneville has run perfectly for 10 years, regularly ridden and maintained. June 2022 im laid up after an operation but started bike once a week. Suddenly it backfires and stops firing on the left cylinder and black smoke and misfires on the right. Have cleaned carbs, tank, replaced fuel filters and hoses, used a couple of cans of carby cleaner and cubic metres of compressed air. One minute it starts, idles and runs perfectly. Next time its back to the regular nightmare. So I clean EVERYTHING again . This cycle has gone on over a month, electrics and plugs are fine. Do you recommend a complete carb rebuild kit? Are the standard keihin carbs for the 2007 865cc the 36mm version?
Ps, thanks and I appreciate any help, comments, cheers
Mick, thanks for sharing your experience. I hope I can be of some help. It is of course difficult to diagnose a problem from a distance with limited information. If you started and ran the bike on a weekly basis during 2022, it’s hard to imagine that the carbs would have become gunked up as they do when left sitting for long periods of time. If the gas in the carbs contained any ethanol, it could have gummed up some of the small pathways and orifices. But, it sounds like you have thoroughly cleaned them out using air and cleaner. And, as you say, it will run fine for a while, and then change back to running poorly. This suggests that it may not be a carb/fuel issue but may be an intermittent electrical issue, or perhaps the CDI/ECU. I would check the plugs again, and maybe replace them to be sure (An inexpensive way to eliminate this option). I would run diagnostics on the coil and make sure both sides of it are meeting specs (I have had to replace my coil a number of times). I also suspect it may be the CDI (Computer/Limiter). You can read about how mine failed and what I did to fix it here – https://triumphbonneville.org/triumph-bonneville-ignition-control-unit-cdi-limiter-failure/ You can also get good help and information on CDI units from Triumph Twin Power – https://www.triumphtwinpower.com/triumph-twin-igniter-info.php. I hope this helps you narrow down the source of the problem and find the correct solution.